|
|
前言
最近在研究将神经网络部署在ESP32上,目前使用较多的方案是使用tensorflow训练好一个模型,然后使用xxd工具将训练好的keras模型转成ESP32可读的C语言头文件,头文件包括神经网络的模型结构和参数,tensorflow官方也给出了教程。本人之前用pytorch比较多,因此想用pytorch训练神经网络,并将训练好的网络部署在ESP32上。
原理
原理其实和tensoflow的类似,只不过加了一个模型转换的过程,首先使用pytorch训练好一个神经网络模型,然后将pytorch训练好的模型转换成keras模型,接着将keras模型使用python中tinymlgen库,生成包含神经网络模型ESP32可读的C语言头文件(替代xxd),最后在ESP32中使用EloquentTinyML库读取头文件中的神经网络模型。
目标
本案例的目标和tensorflow lite官方hello world教程中的目标一样,使用神经网络拟合sin函数,将训练好的神经网络移植到ESP32上,让LED的引脚根据神经网络的输出结果输出PWM波,从而实现呼吸灯的效果。
环境
系统:windows11
软件:
python:3.9(anaconda)
tensorflow:2.10.1
pytorch:1.12.0+cu116
tinymlgen
硬件:
开发板使用的是安可信的Nodemcu-32s,芯片是ESP32,开发环境用的是Arduino
arduino中开发板安装了esp:2.0.5
库安装了EloquentTinyML:0.0.10(2.4后的版本在我电脑上有bug,这个包相对于TensorFlowLite_ESP32库而言,更加简洁,只需要一个模型的头文件,并且加载模型的方法也很简单)
代码
python代码
导入所需的包
import tensorflow as tf
from tensorflow import keras
import torch
from torchvision import models
import torch.nn as nn
import torch.nn.functional as F
from torch.autograd import Variable
import torch.optim as optim
from tinymlgen import port
import math
import numpy as np
import matplotlib.pyplot as plt构建训练集、验证集、测试集,比例是6:2:2,总数是1000
SAMPLES = 1000
x_values = np.random.uniform(
low=0, high=2*math.pi, size=SAMPLES).astype(np.float32)
np.random.shuffle(x_values)
y_values = np.sin(x_values).astype(np.float32)
y_values += 0.1 * np.random.randn(*y_values.shape)
TRAIN_SPLIT = int(0.6 * SAMPLES)
TEST_SPLIT = int(0.2 * SAMPLES + TRAIN_SPLIT)
x_train, x_test, x_validate = np.split(x_values, [TRAIN_SPLIT, TEST_SPLIT])
y_train, y_test, y_validate = np.split(y_values, [TRAIN_SPLIT, TEST_SPLIT])
assert (x_train.size + x_validate.size + x_test.size) == SAMPLES构建pytorch神经网络的模型结构,结构为最简单的全连接层,和tensoflow lite的hello world例程中网络结构相同
class PytorchSinNet(nn.Module):
def __init__(self):
super(PytorchSinNet, self).__init__()
self.input_layer = nn.Linear(1, 16)
self.hidden_layer = nn.Linear(16, 16)
self.output_layer = nn.Linear(16, 1)
def forward(self, x):
x = F.relu(self.input_layer(x))
x = F.relu(self.hidden_layer(x))
x = self.output_layer(x)
return x构建和上述pytorch神经网络结构相同的keras模型
def KerasSinNet():
model = keras.Sequential()
model.add(keras.layers.Dense(16, activation='relu', input_shape=(1,)))
model.add(keras.layers.Dense(16, activation='relu'))
model.add(keras.layers.Dense(1))
model.compile(optimizer='adam', loss="mse", metrics=["mae"])
return modelpytorch模型转keras模型的类,支持全连接层、卷积层、BN层,其他类型的层可参考自行实现
class PytorchToKeras(object):
def __init__(self, pModel, kModel):
super(PytorchToKeras, self)
self.__source_layers = []
self.__target_layers = []
self.pModel = pModel
self.kModel = kModel
tf.keras.backend.set_learning_phase(0)
def __retrieve_k_layers(self):
for i, layer in enumerate(self.kModel.layers):
if len(layer.weights) > 0:
self.__target_layers.append(i)
def __retrieve_p_layers(self, input_size):
input = torch.randn(input_size)
input = Variable(input.unsqueeze(0))
hooks = []
def add_hooks(module):
def hook(module, input, output):
if hasattr(module, "weight"):
# print(module)
self.__source_layers.append(module)
if not isinstance(module, nn.ModuleList) and not isinstance(module, nn.Sequential) and module != self.pModel:
hooks.append(module.register_forward_hook(hook))
self.pModel.apply(add_hooks)
self.pModel(input)
for hook in hooks:
hook.remove()
def convert(self, input_size):
self.__retrieve_k_layers()
self.__retrieve_p_layers(input_size)
for i, (source_layer, target_layer) in enumerate(zip(self.__source_layers, self.__target_layers)):
print(source_layer)
weight_size = len(source_layer.weight.data.size())
transpose_dims = []
for i in range(weight_size):
transpose_dims.append(weight_size - i - 1)
if isinstance(source_layer, nn.Conv2d):
transpose_dims = [2,3,1,0]
self.kModel.layers[target_layer].set_weights([source_layer.weight.data.numpy(
).transpose(transpose_dims), source_layer.bias.data.numpy()])
elif isinstance(source_layer, nn.BatchNorm2d):
self.kModel.layers[target_layer].set_weights([source_layer.weight.data.numpy(), source_layer.bias.data.numpy(),
source_layer.running_mean.data.numpy(), source_layer.running_var.data.numpy()])
elif isinstance(source_layer, nn.Linear):
self.kModel.layers[target_layer].set_weights([source_layer.weight.data.numpy().T, source_layer.bias.data.numpy().T])
def save_model(self, output_file):
self.kModel.save(output_file)
def save_weights(self, output_file):
self.kModel.save_weights(output_file, save_format='h5')用于训练pytorch神经网络时,取一个batch的数据
def get_batch_data(x_dataset, y_dataset, batch_size):
dataset_length = len(x_dataset)
index = np.random.randint(0, dataset_length, batch_size)
x_batch = torch.tensor(x_dataset[index]).resize(batch_size,1)
y_batch = torch.tensor(y_dataset[index]).resize(batch_size,1)
return x_batch, y_batch训练pytorch神经网络
# 超参数
batch_size = 64
epoch_num = 500
learning_rate = 1e-3
train_set_length = len(x_train)
validate_set_length = len(x_validate)
test_set_length = len(x_test)
one_epoch_length = int(train_set_length / batch_size)+1
# 使用GPU
use_cuda = torch.cuda.is_available()
device=torch.device('cuda' if use_cuda else 'cpu')
pytorch_model = PytorchSinNet().to(device)
# 设置loss和优化器
criterion = nn.MSELoss()
optimizer = optim.Adam(pytorch_model.parameters(), lr=learning_rate)
print("one epoch length:", one_epoch_length)
# 训练主循环
for epoch in range(epoch_num):
epoch_loss = 0
for i in range(one_epoch_length):
x_batch, y_batch = get_batch_data(x_train, y_train, batch_size)
x_batch, y_batch = x_batch.to(device), y_batch.to(device)
prediction = pytorch_model(x_batch)
loss = criterion(prediction, y_batch)
optimizer.zero_grad()
loss.backward()
optimizer.step()
epoch_loss += loss
train_loss = epoch_loss / one_epoch_length
x_vali = torch.tensor(x_validate).resize(validate_set_length,1).to(device)
y_vali = torch.tensor(y_validate).resize(validate_set_length,1).to(device)
prediction = pytorch_model(x_vali)
validate_loss = criterion(prediction, y_vali)
print("epoch:{}------train loss:{}------validate loss:{}".format(epoch, train_loss, validate_loss))
# 将模型转到cpu上
pytorch_model = pytorch_model.to(torch.device('cpu'))创建keras神经网络模型,并将pytorch训练好的神经网络参数复制给keras模型
keras_model = KerasSinNet()
converter = PytorchToKeras(pytorch_model, keras_model)
converter.convert((1))使用测试集验证pytorch模型和keras模型推理结果的差异
keras_test_pred = keras_model.predict(x_test)
x_te = torch.tensor(x_test).resize(test_set_length, 1)
y_te = torch.tensor(y_test).resize(test_set_length, 1)
pytorch_test_pred = pytorch_model(x_te)
test_loss = criterion(pytorch_test_pred, y_te)
pytorch_test_pred = pytorch_test_pred.detach().numpy()
# Graph the predictions against the actual values
plt.clf()
plt.title('Comparison of predictions and actual values')
plt.plot(x_test, y_test, 'b.', label='Actual values')
plt.plot(x_test, keras_test_pred, 'r.', label='keras predicted')
plt.plot(x_test, pytorch_test_pred, 'g.', label='pytorch predicted')
plt.legend()
plt.show()

使用tinymlgen这个包可以直接将keras模型转换成ESP32可读的C语言头文件,头文件中包含训练好的神经网络模型参数,这样就可以不使用xxd来生成C语言头文件了
c_code = port(keras_model, optimize=True)
with open('nodemcu32s_sin_led/nn_model.h', 'w') as f:
f.write(c_code)生成的头文件如下:
nn_model.h
#ifdef __has_attribute
#define HAVE_ATTRIBUTE(x) __has_attribute(x)
#else
#define HAVE_ATTRIBUTE(x) 0
#endif
#if HAVE_ATTRIBUTE(aligned) || (defined(__GNUC__) && !defined(__clang__))
#define DATA_ALIGN_ATTRIBUTE __attribute__((aligned(4)))
#else
#define DATA_ALIGN_ATTRIBUTE
#endif
const unsigned char model_data[] DATA_ALIGN_ATTRIBUTE = {0x1c, 0x00, 0x00, 0x00, 0x54, 0x46, 0x4c, 0x33, 0x14, 0x00, 0x20, 0x00, 0x1c, 0x00, 0x18, 0x00, 0x14, 0x00, 0x10, 0x00, 0x0c, 0x00, 0x00, 0x00, 0x08, 0x00, 0x04, 0x00, 0x14, 0x00, 0x00, 0x00, 0x1c, 0x00, 0x00, 0x00, 0x94, 0x00, 0x00, 0x00, 0xec, 0x00, 0x00, 0x00, 0x08, 0x07, 0x00, 0x00, 0x18, 0x07, 0x00, 0x00, 0x28, 0x0c, 0x00, 0x00, 0x03, 0x00, 0x00, 0x00, 0x01,Arduino代码
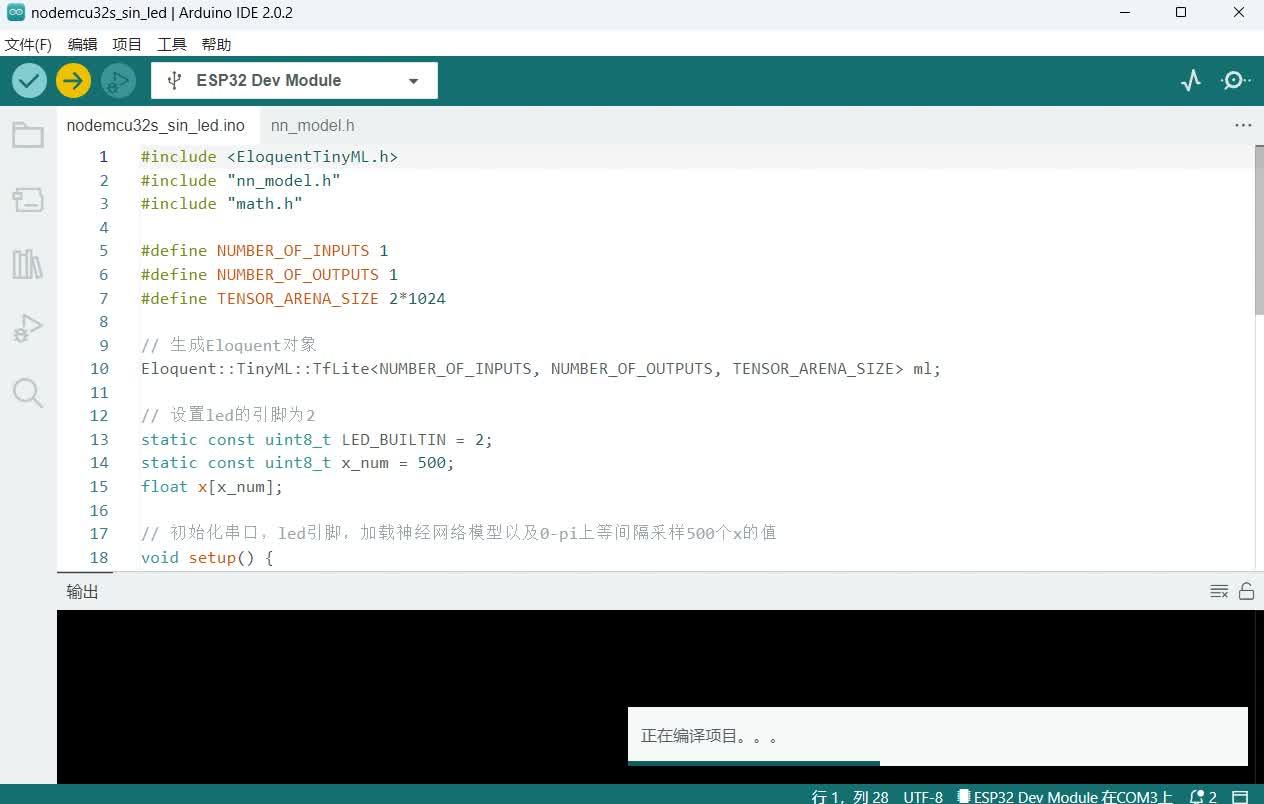
nodemcu32s_sin_led.ino
#include <EloquentTinyML.h>
#include &#34;nn_model.h&#34;
#include &#34;math.h&#34;
#define NUMBER_OF_INPUTS 1
#define NUMBER_OF_OUTPUTS 1
#define TENSOR_ARENA_SIZE 2*1024
// 生成Eloquent对象
Eloquent::TinyML::TfLite<NUMBER_OF_INPUTS, NUMBER_OF_OUTPUTS, TENSOR_ARENA_SIZE> ml;
// 设置led的引脚为2
static const uint8_t LED_BUILTIN = 2;
static const uint8_t x_num = 500;
float x[x_num];
// 初始化串口,led引脚,加载神经网络模型以及0-pi上等间隔采样500个x的值
void setup() {
Serial.begin(115200);
pinMode(LED_BUILTIN, OUTPUT);
ml.begin(model_data);
for(int i = 0; i <= x_num -1; i++){
x = 3.14 * i / x_num;
}
}
// 主循环,for循环中循环读取数组中x的值并使用神经网络推理预测值,使用串口输出x以及对应的真实值和预测值,同时将预测值输出PWM波到led引脚
void loop() {
for(int i = 0; i <= x_num-1; i++){
float input[1] = { x };
float predicted = ml.predict(input);
float y = sin(x);
Serial.print(&#34;sin(&#34;);
Serial.print(x);
Serial.print(&#34;) = &#34;);
Serial.print(y);
Serial.print(&#34;\t predicted: &#34;);
Serial.println(predicted);
analogWrite(LED_BUILTIN, predicted * 255);
delay(10);
}
}
代码下载到NodeMCU32-s
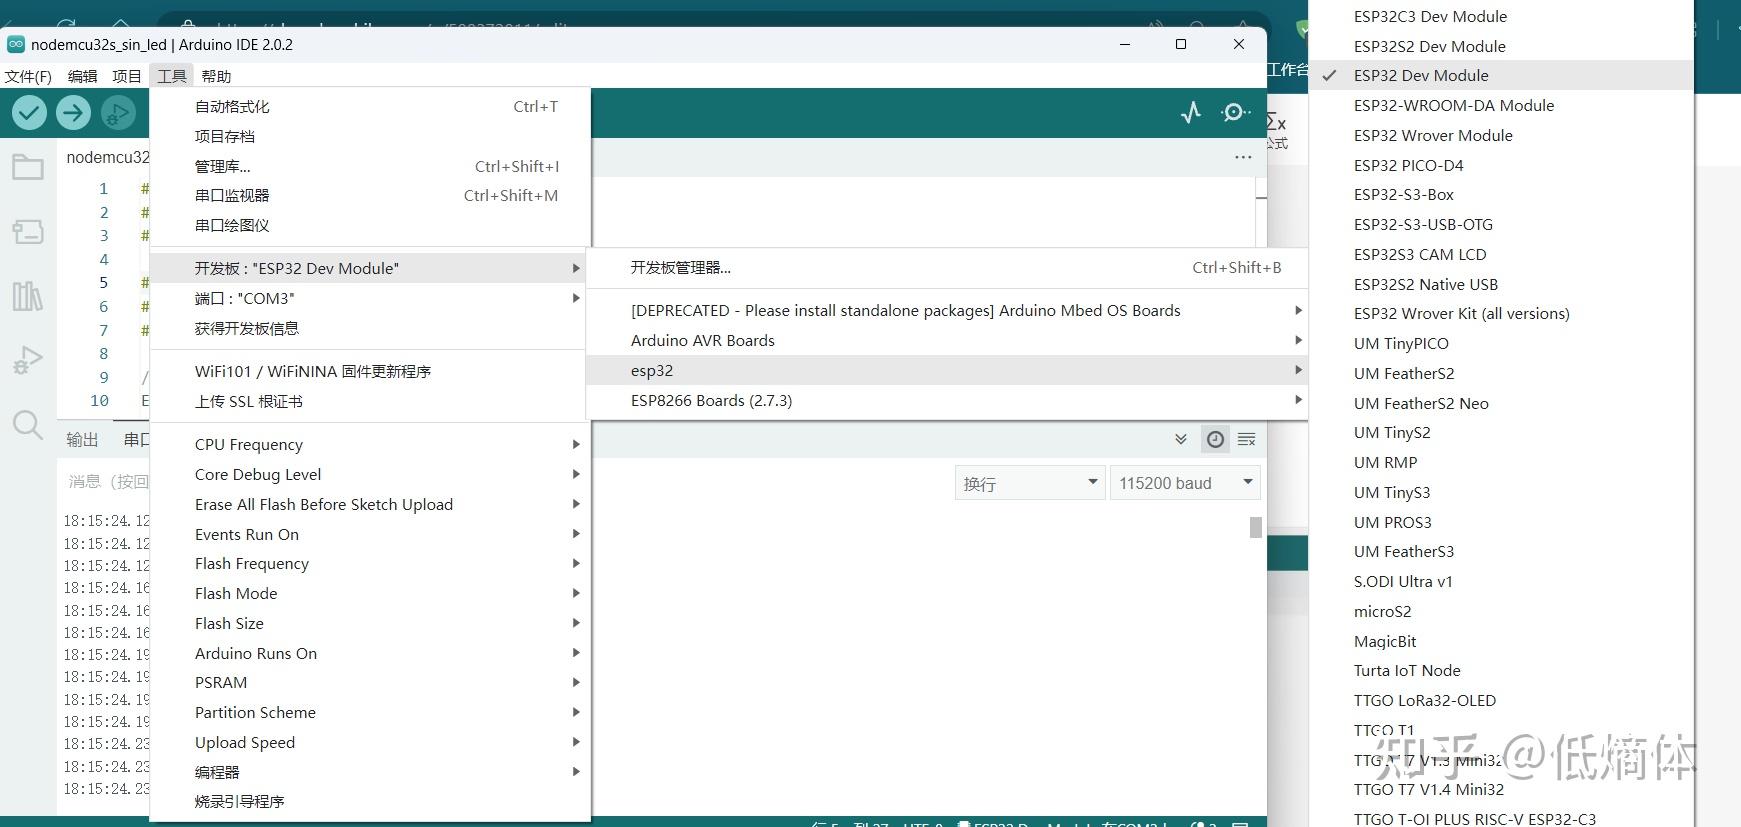
开发板选择ESP32 Dev Module就行了,不要选NodeMCU32-s,在我这有bug
https://www.zhihu.com/video/1581713320272384000
结果
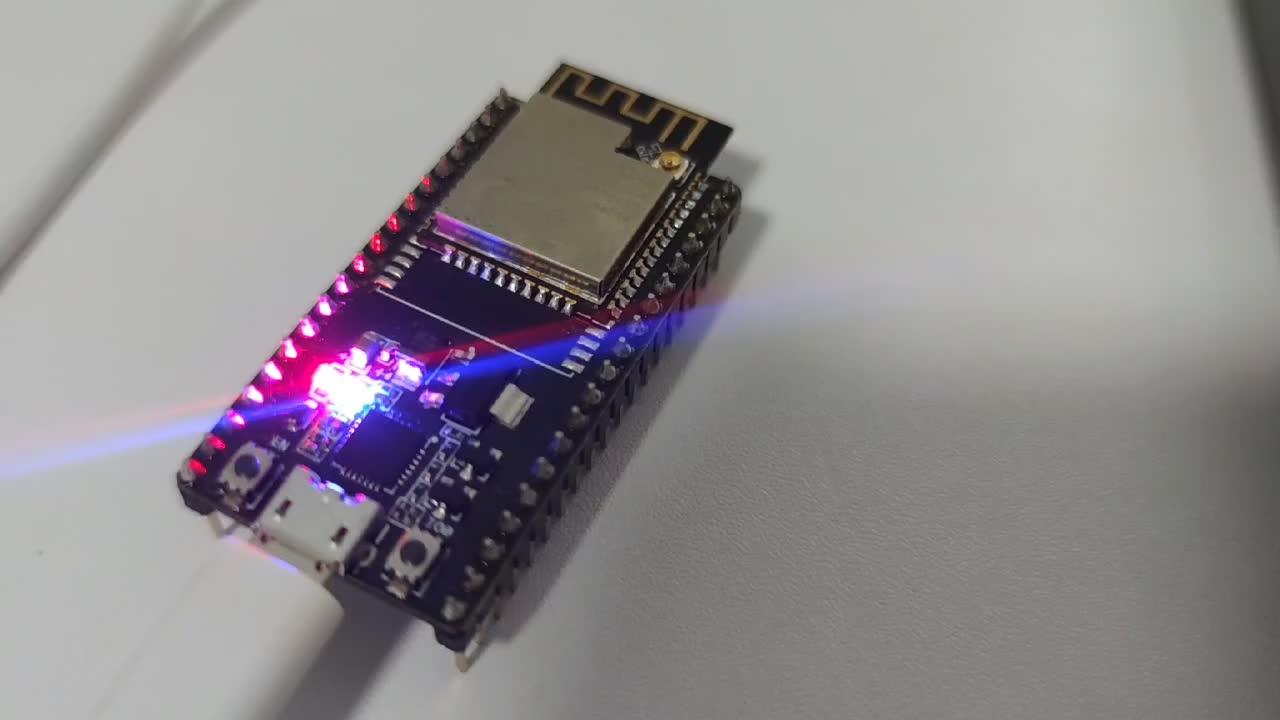
https://www.zhihu.com/video/1581715402861731840
全部代码放在github上了:https://github.com/tabaan/pytorch_tinyml |
|


 发表于 2023-1-1 14:36:25